Search OfficeBooks Help

Showing posts with label items. Show all posts

Tuesday, 8 May 2012

Using Product Packages


Product Packages are ways to group products for quick entry onto sales.

To create a new Product Package:

  • Go to the Sales screen and click the Product Packages link in the top-left corner of your sales list.
  • Click New Package
  • Add a short description for your Package (e.g. Spring Cleaning Kit)
  • Click the New Item link to select a product to add to your package
  • Set the quantity per package for that product and the unit pricing
  • Click the green checkmark to save that line.
  • Repeat the item selection process until your package is complete.
  • Click the Save button to complete the operation (good job!)

Packages will appear with a small parcel icon beside them on the item selector in sales.  Simply select the package, set the quantity and applicable sales taxes, then click the green checkmark to save.  Items in the package will be added as items on the sale.


Confused? Want more help? Just email us at support@officebooks.com We like to help.

Friday, 20 April 2012

Product Packages

One of our early observations during beta testing was that users were trying to bundle products using bills of material.

The concept is straightforward, but BOMs (bills of material) need to be cycled through a work order to complete the associated inventory transactions.

So, we've introduced a Product Package feature.

The approach will be somewhat similar to BOMs.  You can create a new package, and build a list of products in that package, specifying quantities and pricing that will be unique to the bundle.  In this way, you can sell product X by itself at $10, and at $8.50 when it is sold as part of a bundle.

Let's look at an example.
A Tree Trimming Kit Product package
Let's say you sell equipment and supplies to the landscaping industry.  You have a standard set of products you sell for small tree trimming operations.  It consists of 6 different products - everything from saws to first aid kits.    Creating a sale record for this group of products would require you to cycle through the item selector 6 times.  But if you set up the kit as a standard Product Package, you only need to select the package from the item selector.  What a time saver!

You can spot the Product Package in the Item Selector thanks to the little icon.

More detailed "how to" on Product Packages


Leave a comment if you have thoughts on how this could be optimized for your business.

Confused? Want more help? Just email us at support@officebooks.com We like to help.

Thursday, 1 March 2012

Value for Inventory vs. Cost vs. Price - they're different!

It is important to understand the difference between three key financial values tied to your inventory.

Value for Inventory:
This is the amount of financial value you recognize for each unit in your inventory.   Don't confuse this with cost or (worse) price.  If you aren't sure, make your value for inventory equal to your unit cost.  The value for inventory can change over time due to depreciation.

Value for inventory is updated using a weighted average calculation when you build or receive new inventory.

Cost:
This is your cost when building or buying each unit of inventory.  When you purchase an item using a purchase order, the cost field gets updated to reflect the new value (if the "Update cost on purchase" check box is checked).

Price:
This is what you charge customers when selling them a unit from your inventory.

Wednesday, 29 February 2012

Workflows


Workflows are part of the Bill of Materials record related to an item.  They allow you to define the steps to follow when manufacturing your product.

After setting up your work centers, you can add, edit, delete, and re-arrange the workflow steps on the Bill of Materials screen.  The estimated hours field is useful for you to get a sense of how long a batch of parts should take to run through the manufacturing step.  When OfficeBooks introduces its production scheduling tools, they will rely on the estimated hours in your workflow definitions as well as the "Daily hours" you define by work center to map out your production plan.

After you define your workflow, you can link subcomponents on your Bill of Materials to specific steps in your workflow.  This will be reflected on the PDF copy of your work orders.

Work Centers and Tools


What are Work Centers?


Conceptually, Work Centers are possible steps in your manufacturing process.  Typically work centers are defined as specific machines, or processes.  In the image above, you see an example of a typical set of Work Centers.  Work Centers are the basic building blocks for workflows.

In the work center definition, you can set the number of hours the work center is available per day.  This information will be used by the production scheduling component of OfficeBooks (which will be available in a later release).

Tools
Tools can be assigned to steps in a workflow.  By identifying all your tools and assigning them to steps in  workflows, you can reduce the set-up time at workstations and increase your manufacturing efficiency.  Defining tools is optional.  If it overcomplicates things for you, skip it!  You can always define them later (or never, it's up to you).


Thursday, 9 February 2012

Update cost on purchase

On the Item Detail screen, the Cost field can be used to store the unit cost of an item for purchase orders (it's the price your supplier charges you).

The "Update cost on purchase" checkbox tells OfficeBooks to update the Cost field if you place a purchase order with new pricing from your supplier.

Unit Inventory Value

The Unit Inventory Value is the amount (in your local currency) something is worth from an inventory perspective.  Generally speaking, it's the cost of the item when you bought it.  In fact, the value is updated for you automatically by OfficeBooks when you buy an item using a purchase order.  If you already have inventory of the item, OfficeBooks will use a weighted average calculation to adjust the Unit Inventory Value.

If you have 8 widgets, and the Unit Inventory Value is $3.00, your "Item total value" is $24.00 (8 x $3).

You can use the "Adjust Value" button to change the Unit Inventory Value manually.  This should be done with care as changes in inventory value (typically) have tax implications for your business.

In the future, OfficeBooks will offer a set of depreciation tools to adjust values globally.

Careful: don't confuse the Unit Inventory Value with the sales price.


Wednesday, 1 February 2012

How to re-activate (undelete) an item record

To re-activate an item, first go to the items list.
Step 1: Go to the items list


  • Check the "View Inactive" check box
  • Select & open the item record you wish to re-activate
  • Expand the "Other Details" section
  • Check the "Active Item" check box
  • Click "Update" or "Save & Close" to complete the operation.
Re-check the active flag in the Other Details section

Deleting Items in OfficeBooks

By making item records inactive, you effectively delete them from your items list.  They will no longer be available to add to new sales, purchase orders, or work orders.  Existing records that include the item you are making inactive will not be affected by this operation.


  • From the items list, click on the item record you want to make inactive.
  • Expand the "Other Details" section of the item record.
  • Un-check the "Active Item" check box.
  • Click "Update" or "Save & Close" to complete the operation


Related: How to Undelete Items

Thursday, 27 October 2011

Import Items

When you need to add numerous items to OfficeBooks the easiest way is to use the Excel template to enter basic information and then upload your data. The template allows you to enter the following information:

  • Item (part) number
  • description
  • internal notes
  • current stock level
  • minimum stock
  • cost
  • price
Other items fields can be manually adjusted once the import process is completed.

How to Import Items:
  1. Start at the Items Import Page
  2. Click Excel template and save the template to your computer. 
  3. Open the template and follow the instructions provided. 
  4. Select your Excel file 
  5. Click Submit

Tuesday, 25 October 2011

Creating a Bill of Materials (BOM)

Note:  Looking for a way to sell a group of products at the same time?  Product bundles (or packages) is a feature that is in development.  Bills of Material are mainly for manufacturing operations.  Read about the plan for Product Bundles here.


A Bill of Materials (BOM) is a list of parts required to build an assembly of some kind.  The ingredient list in a  recipe is a good everyday example of a BOM.

To specify a bill of materials in OfficeBooks, you must first add an item within your OfficeBooks account.  See Creating an Item in OfficeBooks if you need help.

To build your bill of materials:
  1. Select the item record of the product
  2. Click on the "Bill of Materials and Revision Control" tab to expand that section.
  3. Click on the View/Edit button
  4. You can define a workflow in the workflow section.
  5. Near the bottom of the screen, you will find the components list, click New Item
  6. Select the part to add to the BOM from the selection window.  You can add a new item record from the selection window if required.
  7. Define the quantity required to build one of the product
  8. Click the checkmark to save that item
  9. Repeat steps 6 and 7 until you have completed building the components list
  10. You can add details to the Manufacturing Instructions or Notes fields before saving your work.

This bill of materials has a multiple step workflow and a simple, 2 item component list.


Friday, 21 October 2011

Creating an item in OfficeBooks

Items are anything you might want to track with a number. Generally, anything you make, buy, or sell should have an item number (also known as a part number).

To import multiple items at once, see Import Items

To create a new item record:
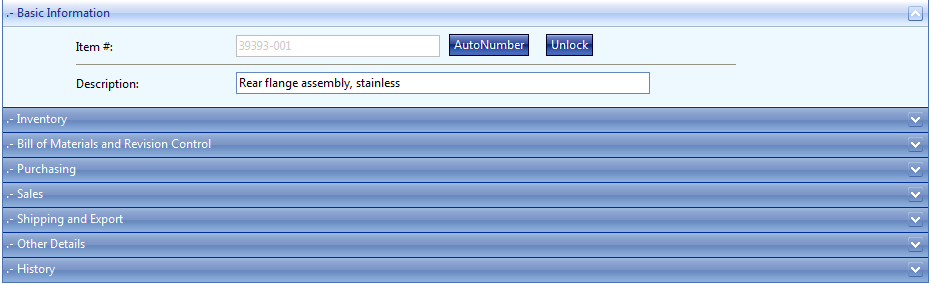
  1. Click on the Items option in the main menu bar
  2. Click the New Item link
  3. Use the Auto-number button to assign a number to the item.  You can also enter your own item number or edit the number that was auto-assigned.
  4. Type a description of the item in the Description field and click Save.
Optional stuff
Inventory
Bill of Materials and Revision Control
Purchasing
Sales
Shipping and Export
Other Details
History